Windows 10 is not dead (+ important YAMDCC announcement)
14 Oct, 2025
If you just want the YAMDCC announcement, skip to here.
Today, October 14, 2025, is the day Windows 10 dies... or so Microsoft wants you to think.
(unless you live in the EU, where you'll get free updates until October 2026, but that's not the point.)
You see, Microsoft will still support two ways to keep your Windows 10 system up to date, whether you don't want Copilot AI going through your system, or just privacy, security, or even usability issues with the OS in general (I will not be going into details here; do your own research).
While I would recommend switching to Linux if you can (I would recommend Linux Mint for beginners - choose the Cinnamon edition unless you're using very old hardware), if you must continue using Windows, you can continue receiving Windows 10 updates by either:
- Installing the 2021 IoT LTSC version of Windows 10 for updates until January 2032 (which this guide covers), or
- Signing up for Extended Security Updates, which will provide you with updates until October 2026.
So what the heck is this "LTSC"?
Microsoft provides LTS support for certain releases of Windows, starting with Windows 10 from what I can tell. The full name of the Windows edition is actually "Windows 10 Enterprise LTSC", with the year of initial release being added to the end (so the last Windows 10 version is "Windows 10 Enterprise LTSC 2021"). You can read more about it on Microsoft's website, but the point is these versions are supported for longer than the mainstream releases you're used to (Home, Pro, Enterprise, etc.)
How much longer, you ask? The latest Windows 10 LTSC gets support for up to 10 years after its release - Jan 13, 2032 for the IoT variant. This is still just over 6 years away, as of writing, giving you plenty of time to try out - and switch to - a beginner-friendly Linux distro.
Anyways, apart from the lifecycle differences, LTSC does remove some features that you might want. These include:
- Microsoft Store, and its pre-installed UWP apps. The classic tools like Notepad, Paint, and Calculator are still here to stay.
- Feature updates - but you probably don't want AI or account requirements if you're reading this, do you?
- OneDrive integration.
- A way to upgrade to newer LTSC versions - that is, you'll have to fresh install the next LTSC release if you must upgrade to the Windows 11 LTSC (the 2024 version is out as of writing).
You may also run into issues with app support in the near future, although I don't think this will be a problem straight away. After all, as of September 2025, Windows 10 still has a 40.5% market share of all Windows versions - Windows 11 sits at 48.94% for reference (source - you might have to edit the time period if reading in the future.
First, consider if you still really need Windows - many Windows apps (especially games) will run just fine on Linux using Wine. There are many Linux distributions - often shortened to just "distros" - to choose from, and you can try it out in a virtual machine or dual-boot. You can search online for many guides on how to install Linux, so I will not get into this here.
Now, if you really still want Windows, you'll need a few things:
- An empty USB drive of at least 8GB in size (if it's not empty, make sure you back up the contents!)
- A computer to install Windows 10 LTSC on (obviously).
- If installing over an existing Windows installation, a backup of your files and settings to another storage device (or cloud service, if you prefer). Do not skip this step - this guide WILL wipe your computer's boot drive!
- An internet connection (if you can read this, you should be good to go).
- Enough free drive space for the downloaded files.
Then, to clean install the LTSC:
- Download the following from MAS's website:
- The MAS activator itself from the homepage (click here to download it directly).
- The Windows 10 LTSC ISO from this page (direct link). If you're using an ARM64 system, download the ISO from this page instead (direct link).
- Download Rufus from here (direct link for x64 or ARM64). Pick either
rufus-4.11.exeorrufus-4.11p.exe, it doesn't matter which. - Once all files are downloaded, plug your blank (or backed up) USB drive into your computer, and open Rufus.
- If possible, disconnect all other USB drives other than the one you want to overwrite, to avoid erasing them instead.
- Under "Device", pick the USB drive that you just plugged in from the list.
- Under "Boot selection", click "Select" to the right of the drop-down, and find your downloaded ISO (it should be named
en-us_windows_10_iot_enterprise_ltsc_2021_x64_dvd_257ad90f.isofor x64 users, anden-us_windows_10_iot_enterprise_ltsc_2021_arm64_dvd_e8d4fc46.isofor ARM64 users). - Under "Partition scheme", select "GPT".
- If you're trying to install LTSC on an older computer, and your drive isn't detected by your computer or shows a warning when trying to boot from it, you might need to select "MBR" instead.
- Under "Volume label", give your drive a name. I use
10LTSC_2021as it fits in the FAT32 name limit, and contains enough information to identify the operating system, including version and variant (this is useful if you have many USBs with OS installers on them!) - Leave all other options as the default. Your Rufus window should now look like this:

- Double-check your drive selection, then click "Start". The next steps WILL erase the selected drive!
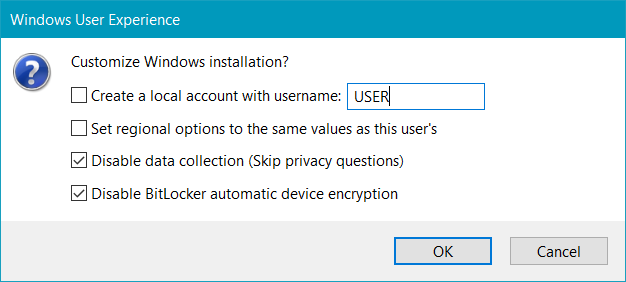
- You will see the following window. Customise the settings how you want, then click "OK". I would recommend keeping "Disable data collection (Skip privacy questions)" enabled:
- Read the warning that appears, then click "OK" to proceed.
- ⚠ This is your last chance to turn back before your USB is erased! ⚠
- Make sure any files on it are backed up somewhere else before clicking "OK"! Otherwise, click "Cancel", and select another USB drive or back up your data.
- Wait a few minutes for everything to finish copying. This step may take a long time depending on your USB drive's speed. Use this time to make sure all your files and settings are backed up, as the next steps will erase your computer's hard drive/SSD!
- Copy the downloaded
MAS_AIO.cmdfile to the root of your USB drive. We will use this to activate Windows later. - You will not be able to read through this page while setting up the new Windows installation. If you haven't already, open this page on your phone (or another device), or if you don't have access to one, print this page (with
Ctrl+P). You can also print this entire post if you want (sameCtrl+Pshortcut). - The next two steps will vary depending on your laptop/motherboard model. Having another device to search your motherboard/laptop manual (or an online guide) will help you figure out these steps (try, e.g. "MSI laptop boot menu"), and follow the instructions. Write the steps down on the printed guide if you need to.
- Follow the instructions you searched up earlier to enter your computer's boot menu. This usually involves holding or pressing a certain key on your keyboard. The key to use is usually the same for a given motherboard or laptop manufacturer, but you may still need to try several keys, and older devices may use different keys to newer ones.
- There are several possibilities next:
- Your computer shows a list of devices to boot from: Congratulations, you found the boot menu! Find your USB drive using the arrow keys on your keyboard (you can also use the mouse or trackpad on newer computers), then press
Return(orEnter) to boot from it. The USB drive will be the same name that you gave it in Rufus, or on some systems will be named after the model of USB drive you used. If you don't know, try different options until you get a setup screen (see the next step). - Your computer shows a screen with many setup screens and options: This is the BIOS setup menu. You can still boot from your USB here, but with more effort. Your search engine of choice is your best friend here, but generally there should be a "Boot options" menu or similar, in which you can re-order the options so that your computer tries booting from a USB drive first. Once you've done that, save and exit, but remember to come back and change the order to the default once you're done installing Windows.
- Your computer shows a password entry screen: You (or your school, workplace, etc.) has locked your computer's BIOS settings from being accessed without a password. If it was you, enter your password, and proceed to one of the two previous outcomes. If not... why are you following this guide in the first place?
- Your computer boots into Windows normally: You probably didn't press the right key to open the BIOS menu, or pressed it too late. Try again, or try another key from your online guide/manual of choice if this continues to happen.
- Your computer shows a list of devices to boot from: Congratulations, you found the boot menu! Find your USB drive using the arrow keys on your keyboard (you can also use the mouse or trackpad on newer computers), then press
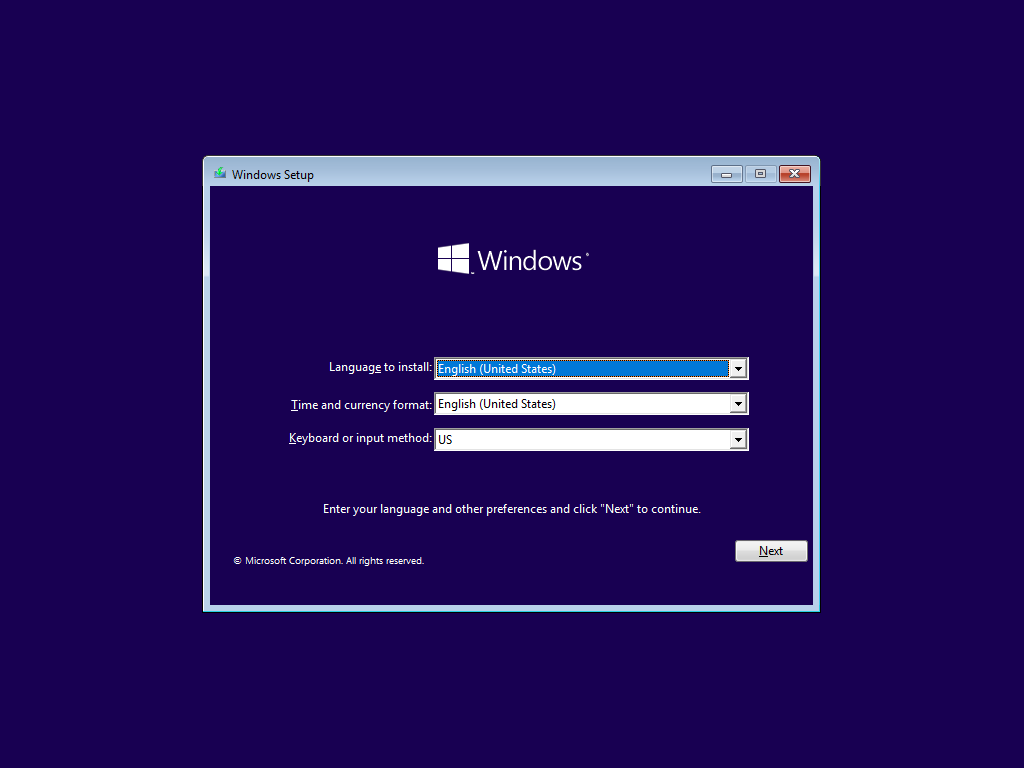
- After a short wait (your screen may be black during this time), you should the below screen. Set your time format and keyboard layout (there will only be one language to install - you can add more later), then click "Next", then "Install now".
- The next screen will ask you to activate Windows - click "I don't have a product key". We will activate Windows later using MAS.
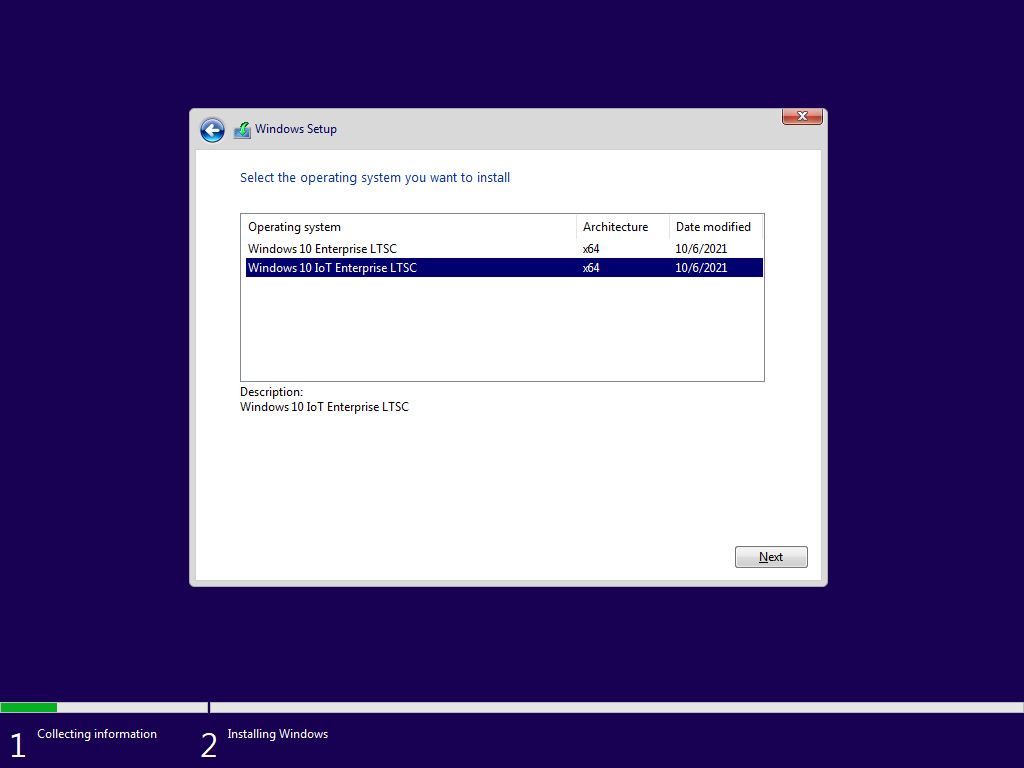
- On the "Select the operating system" screen, select "Windows 10 IoT Enterprise LTSC". It is very important you choose this OS, otherwise you will not receive updates until 2032 (the non-IoT LTSC only receives updates until January 2027). Then click "Next".
- Accept the EULA, then on the next screen, click "Custom: Install Windows only (advanced)". The other option will tell you to reboot back into the old Windows version.
- On the "Where do you want to install Windows?" screen, there should only be one drive here (unless your PC has multiple drives). Select the one containing your old Windows installation, click "Format", then "Next" to start the installation.
- ⚠⚠⚠ This operation will delete ALL data on your computer's hard drive. ⚠⚠⚠
- Make sure your data is backed up to another storage device or cloud service.
- If you still haven't done this yet, reboot back into Windows now and back up your data to another device (make sure this is a different device from the computer you will be installing Windows on!)
- When you are ABSOLUTELY sure your data is on another computer, click "Format". Again, this operation is irreversible!
- If setting up on a new computer, you will not need to format the drive. Just select the "Unallocated space", and click "Next".
- Wait for Windows to finish installing. This will take a long time on older systems (~mid 2010s or older) without an SSD. Go do something else in the meantime.
- Your computer will reboot twice during the installation.
- If your computer connects to the internet via Ethernet, and you want to set up an offline (local) account on your computer, disconnect the Ethernet cable now (before your computer reboots into the "Let's connect you to a network" screen).
- After rebooting a few times, you will be asked to confirm your region and keyboard layout, and whether you want a second keyboard layout. Do as it asks.
- On the "Let's connect you to a network" screen, click "I don't have internet", then "Continue with limited setup". Repeat if your computer reboots, then shows the same screen again.
- If you want to set up a Microsoft account on your computer, set up your internet connection now (plug your Ethernet cable back in if you unplugged it before). The rest of this guide assumes you want to set up a local account.
- Enter your name, but skip the password (unless you want to enter security questions - but keep in mind that the answers are stored in plaintext).
- Follow this guide to set up a password on a local account without security questions.
- If you get the "Choose privacy settings for your device" screen, say no to everything. You can re-enable location services later if you need it.
- Wait for Windows to get everything ready for you. This might take several minutes, so don't turn off your PC.
- You should now be in Windows. Kill Edge with Task Manager (unless you actually like Edge for some reason), then open
MAS_AIO.cmdfrom your USB (which should still be connected). You should see this screen: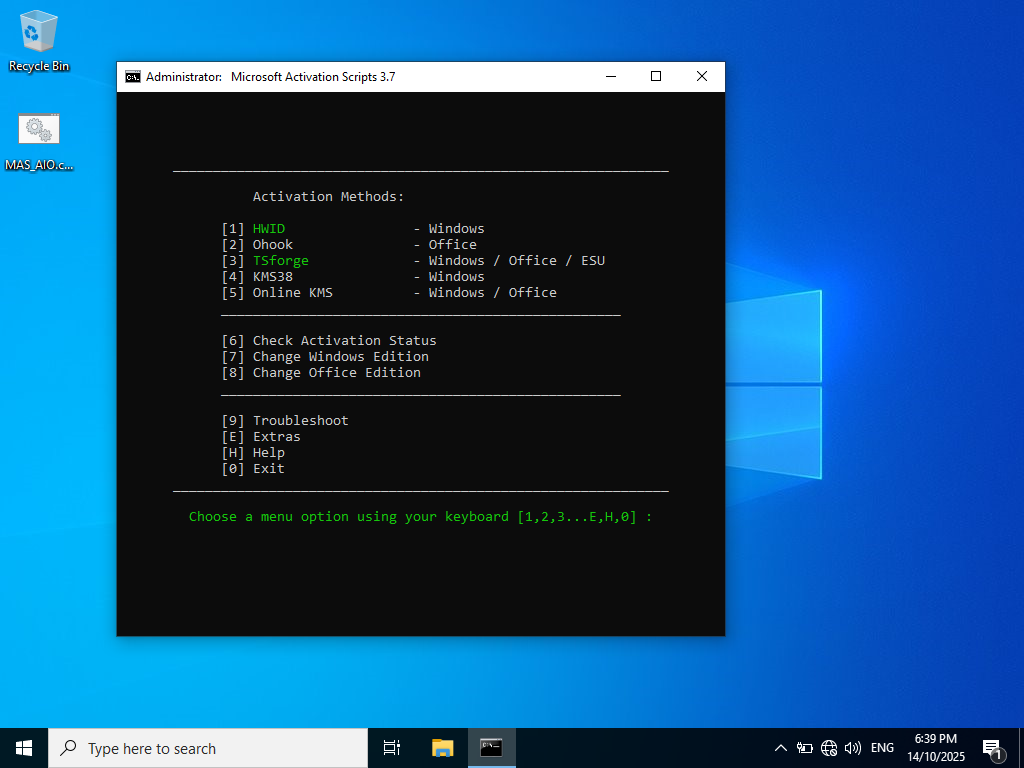
- Connect to the internet if you haven't already, then press
1to select the HWID activator. Wait for it to complete.- If you want to disable telemetry before going online, follow this guide.
- You should not need to repeat this step if re-installing LTSC on the same computer, instead only needing to check activation status from the Update and Security Settings page. It won't hurt if you run this step again though.
- Go to the Settings app and check for and install updates, rebooting if required. There will likely be a lot of updates to install (plus system drivers), due to this version of LTSC being 4 years old as of writing.
- Once you've rebooted back in to Windows, congratulations! You have successfully installed Windows 10 LTSC! Have fun re-installing all of your apps and restoring the backup you made (you did make it before starting this guide, right? Right?)
What's this about YAMDCC?
As you can tell by me shilling Linux, I plan to move to that operating system very soon, first starting with my secondary laptop (that I use for university), then my main laptop (that YAMDCC was made for). Since I will not have a Windows machine to develop YAMDCC for anymore, the project will be put into maintenance mode, with only bug fixes. Before you freak out, I will continue development until I implement as much of the feature backlog as I can, but after that, I'm done with Windows. Microsoft has made it very hard to justify continuing to use their OS with their insistence on shoving AI shit in our faces that I have zero interest in.
Additionally, I don't really enjoy developing this project anymore - not since I released v1.0. I've mentioned it in a few issue comments here and there, but I considered YAMDCC "complete" as soon as it ran well enough to do what I wanted (that is, control the fans and adjust the charge limit of my laptop). This is one of the reasons new features take so long to develop (another being university, but this won't be a problem in about a month, subject to the exam timetable).
If you want to help with YAMDCC development, feel free to reach out on Matrix, or open an issue on Codeberg if I don't respond quickly (within a day or two).